The following short articles were written by the respective manufacturers/suppliers in order to provide HR readers with fast, effective information on a wide range of topics, including fitting, diagnostics, unique hearing aid applications, and marketing/business management concepts. These descriptions were provided by the participants upon request of HR. To learn more information about these topics, or the products/services featured in the tutorials, please contact the companies directly or fill out one of the Action Cards in the issue (found on page 18 and page 66).
| How to: |
|
| Fitting Tips |
| How to Stop Feedback Resulting from a Loose-Fitting Earmold Most dispensing professionals encounter that “one” patient. He’s been in 5 times before. He’s on his third remake and fourth tube, and that’s not including all of your impressions, buffing, grinding, etc. It’s as if his ear was not designed to receive sound at all but to convert it to a loud, malicious, high-pitched squeal. The next time that patient shows up, try the following technique.
For our case, we’ll simply say that it is a loose earmold and sound is leaking between it and the canal wall, causing feedback. The simplest and most effective solution, in this case, is to stent the mold using Accelerated Technology’s AntiFeedback System™. Here’s how the system works: First determine which of the four stent sizes to use based on how bad the mold is feeding back and the size of the canal. If you’re using a CFA on your earmold, you will simply measure how deep to place the stent with the insertion tool and then insert it into the mold. Using a tube through the mold, you will have to trim about a 1/4-inch off of the tube by pulling it out of the top of the canal and trimming it before you can insert your stent. Generally it’s that simple; however, if you misjudged the severity of the leakage, you can still replace a stent with a larger one. To remove the stent you use the extraction tool, which looks similar to a crochet hook. You slide the end of the tool through the inserted stent, hook it, and remove it. You will then be able to repeat the insertion process with a larger stent. For information, contact: |

| Fitting Tips |
| How to Allow Patients to “Test Drive” Their Hearing Aids Before a Purchase Increasing patient satisfaction with and acceptance of hearing instruments is a continuing quest of hearing health care professionals.
American Hearing Aid Associates (AHAA) has a solution. AHAA is now offering its nationwide network of Associates a new tool that allows patients to “test drive” hearing instruments in the simulated environments that give them the most difficulty. Called Life’s SoundSuite™, the system utilizes a fitting protocol which incorporates simulation of a variety of typical real-world sound environments for patients using state-of-the-art visual and surround-sound technology. By experiencing these real-world situations, patients can actually participate in programming their hearing instruments to get the best sound performance possible.
AHAA Associate Gyl Kasewurm, AuD, St. Josephs, Mich, says that she introduced Life’s SoundSuite into her practice some 6 months ago, and the results have been impressive. According to Kasewurm, the state-of-the-art technology delivers a number of important business benefits. Among them, she says, are “better hearing solutions resulting in higher patient satisfaction, increased closing rates, reduced instrument returns, and fewer repeat visits for adjustments.” Kasewurm also says that Life’s SoundSuite has resulted in “new motivation for my staff, and a unique way to energize my marketing efforts.” “Other Associates I know who are also using Life’s SoundSuite are sold on its benefits not only for their patients but also for them and their staffs who now have a more realistic tool to use in the fitting process,” says Kasewurm. For information, contact: |

| Patient Care |
| How to Use Patient Financing to Help More Patients Get Optimal Hearing Aid Technology Patients should not have to compromise because of cost. But with hearing aids averaging almost $2,000 per instrument, finding a way to pay for optimal care and better hearing aid technology can be a challenge. That’s why, today, more and more hearing health care professionals are offering CareCredit® No Interest and Low Interest Extended Payment Plans.
CareCredit helps more patients get the ideal hearing aid today—and pay over time with convenient low monthly payments that fit comfortably into almost any budget. Because CareCredit is a revolving line of credit, patients can use it for initial exams and hearing aids, as well as additional care and charges including repairs, diagnostics, ALDs, and even batteries. And with CareCredit, you receive payment in 2 business days, reducing A/R and the risk of non-payment, while improving cash flow. Quick and easy to use: Using CareCredit is easy. The program features several processing options, including phone, automated phone, fax, and online, with credit decisions provided in seconds.
Pre-Approval lets you know in advance whether most patients will be approved for CareCredit before their appointment or the financial discussion. So, even before cost becomes a concern, you can help more patients say “yes” to optimal technology by giving them the opportunity to pay with No Interest Payment Plans. For treatment fees from $1 to over $25,000, CareCredit offers a comprehensive range of payment options including 3, 6, and 12 Month No Interest and 24, 36, and 48 Month Low Interest Payment Plans. The program is at work in more than 40,000 health care practices nationwide, and has been used by over 2 million patients to get care. For information, contact: |
| Fitting Tips |
| How to Easily Remove (and Replace) an E-A-RTONE 3A Front Tube The E-A-RTONE® 3A Insert Earphone employs a “front tube” between each transducer case and the nipple connector for the foam E-A-RLINK® eartip. As is the case with hearing aid tubing, over time, these sound conducting tubes will discolor slightly and become less pliable. Front tube replacement is generally appropriate on an annual basis. The medical-grade polyurethane front tubes, just under 10 inches in length, are designed and manufactured to precise dimensions and should not be shortened or replaced with anything other than original factory-made parts. Replacement tubes complete with plastic nipple connectors are available from Auditory Systems’ distributors, as are replacement tube nipples alone.
The tubes fit snugly over the E-A-RTONE 3A plastic case nipple. Attempting to remove an old tube by pulling and bending could break the case nipple, and make the insert earphone unusable until a factory repair is accomplished. Removing an old tube can be done safely and easily by using a sharp blade to slit the portion of the tube that goes over the case nipple (ie, the lumen). The old tube can then be removed without damaging the case nipple, and discarded. The lumen of the replacement tube should be stretched with a tube expander before attempting to push it onto the case nipple. A standard hearing aid tubing expander, with its tip filed down to be slightly more slender so that it fits into the lumen of the tube, works well for this application. Mild pressure with the expander, held for a few seconds, followed by a 90° turn and repeat expansion will widen the lumen of the tube sufficiently. The tube should then be pushed onto the case nipple until it touches the top surface of the case. No further attention will be required until the next tube replacement. —Allan H.Gross, MA For information, contact: |
 The tube for the E-A-RTONE 3A Insert Earphone can be easily replaced, but simply pulling off the tube risks breaking the case nipple. Instead, before pulling off the tube, use a sharp blade to slit the portion of the tube that goes over the case nipple.
| Directional Hearing |
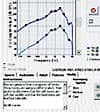
| How to Verify Directionality With Real-Ear Measurements in 5 Easy Steps When prescribing a directional hearing instrument, it is important to verify that the directionality works as you program it to work. The following is a great real-ear measurement technique that is quick and easy to fit into your fitting routine. It uses the Insertion Gain screen to subtract the hearing instrument’s reverse measurement from its forward measurement to find the actual directional advantage of the instrument:
1. Situate the soundfield speaker behind the patient. While the probe tube and the hearing aid are in place in your patient’s ear, situate the soundfield speaker behind your patient. The easiest way to do this is with an external speaker on a swing arm—you can just move the speaker around the patient. Otherwise, situate your patient in a swivel chair and turn him/her away from the speaker. 2. Set Insertion Gain screen for unaided measurement. Enter your analyzer’s Insertion Gain screen and set it up as you normally would for doing an unaided measurement. 3. Perform a real-time measurement. Turn on the hearing instrument’s directional microphone, and use your FONIX analyzer’s Digital Speech or Composite signal to perform a real-time measurement. Remember that your analyzer is labeling this as an “unaided measurement,” but the instrument is actually in the patient’s ear. This is the hearing instrument’s reverse measurement. 4. Move soundfield speaker to 0° azimuth and perform second measurement. Move the sound field speaker in front of your patient and set up your FONIX analyzer to perform an aided measurement. Use the same signal type and amplitude that you used for the reverse measurement to perform another real-ear measurement. This is the hearing instrument’s forward measurement. 5. View the difference between front and back sound sources. Look at the Insertion Gain curve on your analyzer. Usually this is the unaided measurement subtracted from the aided measurement. In this case, however, it is the reverse measurement subtracted from the forward measurement, showing you the hearing instrument’s directional advantage. For information, contact: |
| Fitting TIps |
| How to Gain More Fitting Flexibility with an Open Platform Hearing Instrument System The software-driven microprocessor within the hearing instrument is what characterizes GN ReSound’s DSP Open Platform. This microprocessor allows the hearing instrument to function in a PC fashion with RAM, ROM, and an OS (Operating System). As new software algorithms are developed, they can be added to new and current models of hearing instruments to improve the instrument’s performance. This is analogous to adding a new software program to your PC.
The Canta Open products are 2-in-1 hearing instruments made possible by the DSP Open Platform. A click of a button in the Aventa fitting software allows the hearing care professional to fit either Classic Canta algorithms or Canta Open algorithms. The Classic Canta algorithms include 14-band Cochlea Dynamics WDRC, LASER™ (Fast Acting Noise Reduction and Spectral Enhancement), Digital Dynamic Directionality, and DFS. The same Canta7 device can be reconfigured to a Canta Open product with the ComforTec™ algorithms. ComforTec™ includes WarpOpen WDRC Compression, Noise Reduction with low level Expansion, and Stabilizer™ DFS — all with an open fitting to minimize occlusion.
For more information regarding the Canta family of hearing instruments, contact your GN ReSound representative at 1-800-248-4327. For information, contact: |


| Hearing Testing |
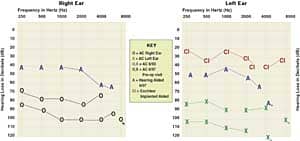
| How to Perform the Masking Level Difference (MLD) Test for a Fast Lower Brainstem Evaluation The MLD is an often-overlooked procedure because of the limited number of clinical audiometers with capabilities to perform the test and a misunderstanding of the purpose or procedure itself. The Interacoustics AC40 can perform the MLD, offering a separate test screen which makes it easy to graph and understand.
Procedure. The AC40 audiometer is a full 2-channel audiometer which can present pure-tones and masking simultaneously to both ears, reverse the phase of the test signals, and provide 1 dB increments for greater sensitivity. The phenomenon that occurs in normal-hearing subjects with normal lower brainstem function is an improvement in perceiving the pure-tone stimulus in the presence of a louder masking signal. This is best demonstrated at lower frequencies. For example, while presenting a 500 Hz pulsed tone at 60 dB HL with the same phase as the 500 Hz narrow-band masking signal at 45 dB HL, the patient indicates when they no longer can hear the tone while the clinician gradually increases the masking level. In most cases, the patient will no longer hear the tone once the masking level is equal to or slightly greater than the signal. By changing the phase of the test signal the patient can hear the tone again. Now simply decrease the intensity of the pure-tone until the patient no longer hears it. Studies have demonstrated that shifts in the hearing sensitivity as a result of the phase change or release of masking are consistently in the range of 10 dB to 16 dB.
More in-depth information on the MLD can be found in the Handbook of Clinical Audiology edited by Jack Katz. For information, contact: |

| Fitting Tips | |||||
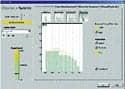
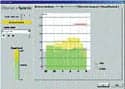
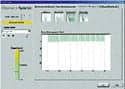
How to Use Syncro Live to Demonstrate Artificial Intelligence in Hearing Instruments
The new Oticon Syncro introduces artificial intelligence to hearing instruments. Syncro has an exceptional real-time tool called Syncro Live. This tool assists hearing care professionals in effectively demonstrating the intelligence in Syncro to potential clients and their families. Syncro Live requires Genie 5.0, Noah 3, Noah Link, and a computer system with 800K of RAM. To activate this feature, connect a working Syncro instrument to Noah Link. Enter the fitting screen for Syncro in Genie 5 and press the “Syncro Live” icon. The software will give a live representation of exactly what the instrument is “hearing” in real time. It is not a simulation; it shows exactly what Syncro is hearing at that moment. This system is best used with the multimedia sound demonstrations in Genie 5 and a set of high-quality speakers. However, even without any of this, Syncro Live can be used to demonstrate how Syncro can recognize speech, noise, the direction of a dominant sound source, whether or not there is wind noise and or if the feedback management system is active. Syncro Live has 4 separate screens. The first screen (Figure 1) shows how Syncro analyzes sounds in real time. Three additional screens can be used to demonstrate: MultiBand Adaptive Directionality, Tri State Noise Management and Voice Aligned Compression (Figures 2-4). Fitting advanced technology requires clear and helpful sales demonstration tools. Syncro Live helps demonstrate how Syncro’s intelligent features function in synergy to improve hearing in complex listening environments. For information, contact: |
| Fitting Tips |
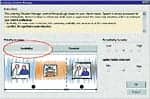
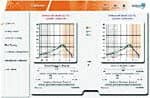
| How to Choose Between the “Audibility” and “Comfort” Selections in the Phonak Perseo Perseo introduced the concept of PersonalLogic, a custom programmable automatic system that updates signal processing parameters in response to the acoustic environment. The Listening Situation Manager is the software control allowing the hearing care professional to program PersonalLogic according to the wearer’s preference for hearing in noise. One of the programmable parameters in the automatic system is the Priority in Noise (in addition to the Sensitivity to Noise and Contrast parameters). This control determines what type of environment causes the Perseo hearing instrument to switch from its program designed for quiet (QuietSituations) to its program designed for noise (NoisySituations).
Comfort: Some wearers require their hearing system to automatically reduce background noise as soon as it occurs regardless of whether speech is present. For those clients, “Comfort” should be chosen as the Priority in Noise. PersonalLogic will react fast in noisy environments by activating NoisySituations processing and all the noise suppression features. Audibility: Other clients prefer noise to be suppressed enough so that it is not uncomfortable, but wish to remain aware of the noises around them. In this case, the “Priority in Noise” should be “Audibility” (software default). PersonalLogic matches this preference by applying some noise suppression in QuietSituations processing unless speech occurs. As soon as speech and noise are detected, it activates NoisySituations processing for maximum speech intelligibility.
If your client wants to be aware of extraneous sounds, choose “Audibility.” However, if they want maximum noise suppression, choose “Comfort”. Understanding speech in noise is always optimized in both “Audibility” and “Comfort.” The ultimate goal of PersonalLogic (programmed through the Listening Situation Manager) is to allow for client preferences, and allow for the right type of processing in the right type of environment for the individual client—providing personal solutions and not “fixed” factory settings. For information, contact: |
| Marketing |
| How to Benchmark Your Battery Business Successful dispensing professionals know that selling batteries is an important and profitable part of a practice. To be successful in selling batteries a cohesive business plan is essential. To grow your practice’s sales and profits, follow these 4 simple steps: Gather your data: Start by doing a detailed evaluation of your current business or business opportunity. Proper business decisions demand quantitative data. The data you gather here will be utilized in several calculations and will assist in calibrating:
Identify your sales opportunity: The average hearing aid utilizes 26 batteries per year. When you understand your hearing aid sales and expected share of battery sales, you can identify your maximum opportunity. Set a sales goal: Once you identify your maximum opportunity, you should then set a sales goal for the year. Having a goal will allow you to gauge how successful you have been in selling batteries. Develop a business plan: Sales won’t happen on their own. Direct mail, battery clubs, and merchandising are all strategies to help you achieve your sales goal. There are many resources available to help you develop your business plan. Rayovac Ultra ProLine Product consultants are experts at marketing batteries, offering the most complete battery marketing program available. Utilize their expertise in developing a business plan. Following these simple steps will increase your battery business. Further, selling batteries offers a unique way to keep in contact with your customer base. Think about how increasing your battery sales will assist you in word-of-mouth advertising. By selling more batteries, you will in turn sell more hearing aids. For information, contact: |
| Fitting Tips |
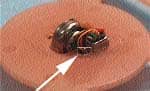
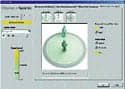
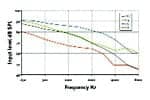
| How to Solve the Occlusion Effect The Occlusion Effect (OE), defined as unwanted, increased loudness sensation while wearing a hearing aid, is a common problem with hearing aid fittings. Resolution of the OE is essential for successful hearing aid use.
A recent study1 verified that the SeboTek® PAC (Post Auricular Canal) instrument effectively eliminates the OE. The PAC’s deep and comfortable fit, its active and flexible seal, and unique design leads to OE solutions without the use of notch filters or rolling off the highs.1,2 This study indicated that the PAC provided maximum measured reduction of the OE from an expected 25 dB to a mean of -3.6 dB.3 This objective reduction was confirmed by corresponding subjective improvement comments about the quality and loudness of the signal. The PAC design features a speaker module that fits deep within the ear canal and makes full contact with the bony structure (see figure), a significant variable in eliminating the OE. When properly fit, the soft silicone tip that surrounds the speaker makes complete but minimal contact with the canal wall, yet the cartilaginous region (which is also suspected as contributing to the OE) remains open. Data shows that the PAC, which addresses a number of issues related to deep canal technology, effectively manages the frequently encountered OE problem. Using the PAC, dispensers increase their chances to better satisfy many hearing aid purchasers and remove a leading reason for rejection of hearing aids. — By Wayne Staab, PhD References For information, contact: |

| Pediatric audiology |
| How to Effectively Use CONNEXX™ to Fit Pediatrics The kid g-ear™ program for support of pediatric hearing instrument fittings was recently introduced by Siemens Hearing Instruments. Fitting hearing instruments on an infant or small child can be a complex process, especially when complete audiometric information is not available.
Educational Programs
For the hearing care professional, the Hearing Makes Friends Scientific Contributions from Pediatric Audiology provides a summary and review of important pediatric articles pertaining to diagnostics, amplification, FM use, and other important topics. Additionally, the kid g-ear Product Guide provides professionals with a comprehensive overview of Siemens BTEs highly recommended for pediatric fittings and an explanation of the various components of the program. For information, contact: |

 Siemens kid g-ear program
| Fitting Tips |
| How to Use the Binaural Balance Feature in NATURA 3 Hearing Instruments The Binaural Balance procedure is designed to maximize sound localization for a patient with an asymmetric hearing loss and a binaural hearing aid fitting. The goal of the procedure is to balance the fitting so that the volume of environmental sounds is equal in both ears. The Binaural Balance feature is exclusive to SONIC innovations’ NATURA 3 product family and can only be accessed in EXPRESSfit 4.0 and higher programming software. After you have connected a pair of NATURA 3 hearing aids and entered EXPRESSfit: 1. Click the “Fit Hearing Aid” button. This displays the Fitting screen. 2. Click the “Binaural Balance” tab. This displays the Binaural Balance screen. 3. Use the Program drop-down menu at the top of the screen to select the desired fitting program. You may perform this procedure for programs where the input is identical between ears. 4. Determine which curves will be balanced. By default, only values on the “5” curve (ie, the gain curve) will be balanced. If you would like to balance values on the “9” curve (ie, the output curve), or values on both curves, select the desired option. 5. Verify the selected test frequencies. If EXPRESSfit detects an asymmetric loss at a frequency (ie, if there is a >10 dB difference between the loss in each ear), the frequency will be automatically selected. You may add or remove test frequencies by selecting or deselecting the checkbox next to the desired frequency.
6. Click the “Begin” button to begin the binaural balance procedure. The first step in the procedure is to demonstrate the binaural balancing task to the patient. Follow the instructions on the screen and use the Left Softer, Both Equal, and Left Louder buttons to indicate the level of the tones that are played. When both tones are of equal volume and the “Both Equal” button is pressed, the procedure continues to the next test frequency. 7. Click the “Finish” button. When you have finished the Binaural Balance procedure, click the “Finished” button to return to the Fitting graph. For information, contact: |

| Marketing |
| How to Ensure Listening Comfort for Patients Recently, there has been a resurgence of information regarding verification of hearing aid fittings, and in particular ensuring that the output from the hearing aid is not perceived as “too loud.” Therefore, it is somewhat surprising—as well as unnerving—that 80.8% of current hearing aid wearers in the United States express the desire to have “loud sounds be less painful.” It appears that we may not be doing as much as we can to verify that our patients are leaving our offices hearing all sounds at comfortable levels.
One quick and easy way to address this issue is by using Starkey’s Verify feature. This feature generates tones in-situ (through the hearing devices) at two presentation levels. One level simulates hearing aid output for soft input levels (50 dB SPL) and the other simulates hearing aid output for loud input levels (90 dB SPL). The patient is given the following instructions: “You are going to hear a sequence of tones. These tones are going to differ in pitch. Your goal is to determine that the soft tones are soft but audible, and that the loud tones are loud but tolerable.” The tones are then presented either automatically, one after another, or they are presented individually. If presented automatically, the clinician can select an ascending or a descending pattern, the speed of the presentation, and he/she can stop the test at any time. Based on the patient’s response, the clinician can switch to the “Adjust” tab and make changes to the necessary frequency regions. Once the comfort of the individual aids has been verified, the next step is to play a loud (eg, 90 dB SPL) broadband stimulus and verify that the hearing aid settings continue to be comfortable. This is important as both binaural listening and loudness summation (due to the multiple channels) may make the aids sound louder than they did under the monaural tone condition. Options for broadband stimuli include choosing from a “.wav file” in the PFS Audio File Player (and verifying the level with a sound level meter) or using a speech or noise stimulus generated by real-ear equipment. Following these loudness verification steps will ultimately improve overall user satisfaction and ensure that your patients are content in a wide variety of listening situations. For information, contact: |
| Fitting Tips |
| How to Fit an Active Patient Using the Dynamic Sound Scene in Liaison Liaison™ is an automatic, intelligent choice for keeping active clients connected to life’s dynamic sounds. As clients move through listening situations, sophisticated technologies within one program—Dynamic SoundScene™—adapt intuitively to provide the best listening experience. Dynamic SoundScene encompasses group conversation, the telephone, outdoor pursuits, and quiet activities in a single program. Adaptive beamformer, Intelligent Noise Reduction 2.0, realtime feedback canceller, and wind noise manager employ an advanced algorithm that adjusts each component for optimal performance as the client changes listening environments.
Noise Reduction Activation Level. Settings range from 45 dB (low kneepoint) to 63 dB (high kneepoint) in increments of 6 dB. Set a high activation level if clients wish to hear soft environmental sounds and prefer noise reduction only for the loudest background noises. Set a low activation level to suppress even soft noises.
Wind Noise Manager. Enable or disable the wind noise manager in End Fitting. The wind noise manager progressively adapts to changing wind conditions automatically. Realtime Feedback Canceller. Effective for your active clients, the realtime feedback canceller dynamically suppresses feedback using 12 independent feedback detectors, which simultaneously attack feedback peaks at different frequencies. For information, contact: |
| Client Management |
| How to Build Customer Loyalty and Satisfaction Using the Tech-care Kit A key to keeping a customer satisfied is to educate them on the importance of ear hygiene and hearing aid maintenance. The Tech-care kit is designed to assist the hearing care professional to accomplish that goal. The kit provides patients with the needed products to care for and maintain their recent hearing device purchase. It also demonstrates the hearing health care professional’s commitment to customer satisfaction—a key ingredient to establishing long-term loyalty. There are 9 products contained in the convenient kit to help your customers care for their investment.
Tech-care Clean Wipes. These are alcohol-free disinfectant wipes used to clean hearing aids and ear molds. They are packaged in a convenient pop up container (36 count). Sta-dri Dehumidifier. Used as an overnight dehumidifier for hearing aids (supplied with a renewable desiccant). Ear-fresh. Ear-fresh is an alcohol-free ear hygiene solution used to clean the outer ear area. Earmold Cleaner. Earmold cleaner is a 2 oz alcohol-free spray used to sanitize ear molds and ITEs. Battery Tester & Battery Caddie. These handy battery accessories can easily be attached to your customer’s key chain and help avoid battery emergencies. Phone Coupler. Hearing Aid users appreciate this comfortable phone coupler that helps reduce irritating feedback while using the telephone. Wax Tool and Brush. These useful tools assist your patient in the daily removal of cerumen. A conveniently located magnet molded into the tool aids in battery removal. The Warner Ear-care Kit can be marketed in several ways:
For information, contact: |

| Business Management |
| How to Promote Your Practice’s Services Well-trained and educated hearing care professionals are very good at the technical side of the business. They are experts at understanding patient’s needs and concerns, administering hearing tests, interpreting audiograms, and selecting appropriate hearing instruments. But is that always enough to make a practice a success? And if a practice is doing well, how could it be more profitable? Unfortunately, training programs do not typically teach business development.
And what about those existing patients? Is there something more you can offer them? Do you provide services or products they may not know about? Do they have family members or friends who could benefit from those services? Westone has made it easy for you to spread the word by producing 8 consumer-oriented brochures covering 16 product lines. You can now easily promote custom-fit hearing protection, swimplugs, products for musicians, assistive listening devices, hearing instrument care products, and more. There is even room for you to personalize the brochures with your contact information. The complete selection of brochures—along with a set of attractive acrylic display racks—is available to you at no charge. Display the brochures prominently in your practice. While there, your patients may discover a device that can help them better understand television; or sleep plugs for Mabel next door; or a custom-fit hands-free cell phone headset for their daughter. The key is often not to focus on making the business bigger, but on getting the most out of your existing business. Treat your patients like friends and let them know what else you have to offer. If you do that well, your business will likely get bigger on its own. For information, contact: |

| Fitting Tips |
| How to Ensure Patient Satisfaction Using the Senso Diva ITC Fitting a custom Senso Diva hearing aid is simpler than you think. However, there are several steps to remember in order to ensure satisfaction with the fitting.
2. Ensure comfort. Make sure that the Senso Diva ITC fits comfortably in the ear and that the angles formed by the dual microphones are within 20° of each other in both the horizontal and sagittal planes. Check that the faceplate is not inserted by more than 3 mm beyond the tragus, and that both microphone openings are visible (see figure). 3. Perform Sensogram in a quiet room. An in-situ threshold measure (sensogram) at 500, 1000, 2000, and 4000 Hz is required to specify gain at these and other frequencies. Frequencies within the interoctaves can also be tested for more precise threshold specification. The expanded sensogram may be helpful for atypical audiograms with >20/octave change in hearing thresholds. 4. Conduct feedback test. A feedback test will be needed to estimate the feedback path and to set the gain limit of the Senso Diva. Make sure that the test is performed in a quiet room with no reflective surfaces near the patient. A slight “jaw-open” position is desirable. 5. Voila! You have just fit a Senso Diva hearing aid successfully. This will satisfy the majority of your patients.
For information, contact: |
 1. Start with a perfect ear impression. Make sure that the earcanal is clean before you take the impression. Also make sure the impression material goes beyond the second bend, and covers the tragus and helix areas of the pinna.
| Business Management |
| How to Make Battery Sales More Profitable While Promoting Your Practice Hearing aid batteries not only contribute to your revenue, but they also represent an important marketing tool of your practice. By providing your customer with a high quality and affordable battery, you may expect more personal contacts, more exposure for your business, and more loyal satisfied customers.
The ZeniPower battery is a proven high performance product. For the last 16 years it has been successful in Asia, and the company could be your best profit source for batteries and serve as a powerful marketing tool. The world’s second-highest working voltage makes it suitable for latest digital hearing aids, as well as for cochlear implants. It is also within the top-3 longest lasting hearing aid batteries in the industry, and is a world-leader in terms of economical price. An alternative brand of batteries has proven to be quite effective for improving customer satisfaction. Providing customers with a choice in power sources makes good business sense. With the alternative of ZeniPower batteries, your customers will find a quality battery at much better pricing than even most mass-merchandising retail stores like WalMart. They will come back to you to buy this battery again and again. And, while it attracts more traffic, it will bring you more business and profits.
ZeniPower also provides you with private label batteries on request. For information, contact: |
 Unfortunately, the current trend is that more and more batteries are sold by retail outlets than by hearing care professionals. Part of the reason is simple: Consumers can buy the batteries at a much lower cost from retail chains or via the Internet. In many cases, hearing care professionals have not only lost their battery sales, but they have also lost their customers, too. That’s why a battery source like ZeniPower has been provided in order to help you compete and to get your customers back.