The following short articles were written by the respective manufacturers/suppliers in order to provide HR readers with fast, effective information on a wide range of topics, including fitting, diagnostics, unique hearing aid applications, and marketing/business management concepts. These descriptions were provided by the participants upon request of HR. To learn more information about these topics, or the products/services featured in the tutorials, please contact the companies directly or fill out one of the enclosed Action Cards (found on p. 66).
Business Management
How to Track Sales and Better Organize Your Practice
Did you ever wonder “How many BTE’s were sold last year?” or “I know this patient purchased an aid through me; however, I can’t find the invoice, so where can I get it?” or “How many hearing aids have I purchased from each manufacturer?”
AHAA added ReportLink, a comprehensive account management portal for its associates, to its Bizlink Web site in June. It provides AHAA associates with access to real-time information regarding their AHAA account.
Through AHAA Bizlink’s ReportLink, associates can view basic and advanced reports. An associate can dispute an invoice, request a return for credit, and much more! They can also view graphs indicating yearly and monthly sales and gross unit percentages by vendor. Associates with multiple locations can view reports specific to each location. In addition, associates can export the information into Word, Excel, and QuickBooks.
AHAA ReportLink is a secure Web site for network members only. System requirements: Browser: Internet Explorer 5.1 or greater or Netscape 6 or greater; Productivity Software: Adobe Acrobat, Office 2000 SP2 or greater, and Macromedia Flash.
This new tool is one of many products and services that AHAA offers to its associates nationwide. Non-members seeking more information about AHAA ReportLink may contact the company.
For Information, contact: AHAA, West Chester, Pa; www.ahaabizlink.com; (800) 984-3272
Fitting Tips
How to Eliminate Feedback in 3 Easy Steps Using the Bernafon Symbio
Feedback! We’ve all experienced the frustration of a hearing instrument that just won’t shut up; the tension that arises when a client experiences that most uncomfortable of sounds—the dreaded howl! Bernafon’s full-line digital Symbio family utilizes an effective, patented Adaptive Feedback Cancellation system to stop feedback in its tracks. The solution is an easy 3-step procedure.

Step 1. Run a feedback measurement. This measurement consists of a sweep of moderately loud pure-tones generated by the hearing instrument receiver. The level at which these tones reach the microphone of the hearing instrument indicates the attenuation of the receiver-to-microphone path and therefore the allowable gain before feedback. It’s automatic, accurate, easy—and it’s fast! Just ensure that the hearing instrument is properly positioned in the client’s ear for the test. After this measurement, the Oasis plus software will automatically activate the Adaptive Feedback Canceller, if required.
Step 2. Verify that the Feedback Management has been effective. Check that the Feedback Manager has stopped the feedback in the problem situation. If it has, then it’s only a 2-step procedure for you! You’re done. In the rare event that it hasn’t stopped the feedback, proceed to Step 3.
Step 3. Adjust the “safety margin.” The safety margin controls how much gain the instrument will allow in each individual fitting. As it implies, it is a gain “buffer zone.” The default safety margin is 6 dB, which allows some safety against changes to the receiver-to-microphone path (eg, when the user puts on a hat). The maximum safety margin of 9 dB should be used if some feedback is experienced when the user goes about their daily life. If the safety margin is set to zero, then there is little or no safety against feedback. This should only be used when “gain is of the essence,” and feedback can sometimes be tolerated.
The Adaptive Feedback Canceller may sometimes take a couple of seconds to suppress strong feedback, so when testing the system be sure to allow a couple of seconds for the Adaptive Feedback Canceller to take full effect.
For Information, contact: Bernafon Inc, Somerset, NJ; www.bernafon-us.com; (888) 941-4203
Recommending Devices
How to Help More Patients to Accept the Hearing Aid Technology You Recommend
If you only accept cash, checks, and major credit cards like VISA and Mastercard, the cost of recommended care and optimal hearing aid technology can put a financial strain on many of your patients. Studies show that the average American only has about $300 available credit on their consumer credit cards, and can’t comfortably write a check for more than $500 out of their monthly budget. And, unfortunately, most insurance plans rarely cover the actual hearing aid, fitting, and follow-up care. Giving patients a way to pay with convenient, low monthly payments can be an ideal solution. Offering patient financing through CareCredit®, lets you do just that.
With no up-front cost, patients can get fitted with the hearing aid that will give them the best results — and pay for the aid over time. Because CareCredit’s payment plans are “open ended,” like a revolving line of credit, they can be used not only for initial exams and hearing aids, but also for additional care and charges including repairs, diagnostics, ALDs, and even batteries.
Andrea Davidson, an audiologist, consultant, and owner of the Hearing Spa of Beverly Hills, has found the CareCredit program to be a great success in her practice. “Offering CareCredit has enabled many patients, who otherwise would have had to settle for less-than-optimal care, to get better hearing instruments — it’s a very effective program,” says Davidson.
Offering CareCredit will give more patients a way to accept recommended care and optimal hearing aid technology. But it can also benefit your practice in other ways, including reducing return rates and increasing cash flow and revenue. Additionally, the CareCredit program can be used as a great marketing tool to help grow your practice. Remember, any additional services you can provide your patients can only help to give them a more positive experience while dealing with your practice — and lead to greater satisfaction and your success.
For Information, contact: CareCredit, Anaheim, Calif; www.carecredit.com; (800) 839-9078
Hearing Testing
How to Perform a Hearing Test Without the Benefit of a Sound-Treated Room
An issue that affects some practices more than others—but inevitably arises at some time for most hearing health care providers—is the need to perform a hearing threshold test with a portable audiometer in an environment where a sound-treated enclosure is not available. Unfor-tunately, testing performed using an audiometer with supra-aural earphones where the ambient sound levels exceed those specified in the current (ANSI S3.1-1999)1 standards may result in artificially elevated thresholds. Without the benefit of a sound-treated enclosure, as may be encountered during testing at a hospital bedside, supra-aural earphones do not provide adequate attenuation. Regardless of the earphone cushion type used, excessive ambient noise, particularly in the low frequency region, may elevate hearing threshold levels by as much as 20 dB-25 dB.2


Audiometric testing in “field” conditions can be accomplished successfully, however, by using a portable audiometer with a calibrated insert earphone. The proper use of an insert earphone with slow-recovery foam eartips can provide noise exclusion equivalent to a single-wall booth. In most cases, testing to audiometric zero can be safely undertaken with a properly designed insert earphone whenever the SPL of the background noise is less than 45 dBA.3 Mean test attenuation for four earphone systems was demonstrated by Frank & Wright.4 Insertion depth influences attenuation of foam earplugs. Generally, as insertion depth increases, the amount of attenuation increases.5 Although an insertion depth equal to the “Full Insertion” shown in Figure 1b is ideal, the (EARTONE 3A) levels in Figure 1a should be obtainable with most patients when the outer edge of the foam earplug is just flush with the bowl (floor) of the concha. —Allan H.Gross, MA
References
1. American National Standards Institute. Maximum Permissible Ambient Noise Levels for Audiometric Test Rooms (ANSI S3.1-1999). New York: ANSI; 1999.
2. Killion MC, Studebaker GA. A-weighted equivalents of permissible ambient noise during audiometric testing. J Acoust Soc Am. 1978;63:1633-1635.
3. Killion MC, Villchur E. Comments on “Earphones in audiometry” [Zwislocki et al.]. J Acoust Soc Am. 1998;83:1688-1689.
4. Frank T, Wright DC. Attenuation Provided by Four Different Audiometric Earphone Systems. Ear Hear. 1990;11:70-78.
5. Berger EH. Laboratory attenuation of earmuffs and earplugs both singly and in combination. Am Ind Hyg Assoc J. 1983;44,321-329.
For Information, contact: E-A-R Auditory Systems, Indianapolis; www.aearo.com; (800) 624-5955
Fitting Tips
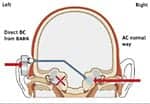
How to Overcome the Head-Shadow Effect of Single-Sided Deafness Using the BAHA
People living with Single Sided Deafness (SSD) are forced to cope with significant problems recognizing speech and determining directional sounds. And according to House Ear Clinic research audiologist Andy Vermiglio, MA, the head-shadow effect further muffles voices and sounds directed toward a listener’s deaf ear. The head-shadow effect occurs when the head acts as a sound barrier. Varying in severity with each person living with SSD, this phenomenon is a cause for complaint in many cases. “I hadn’t realized the degree of difficulty experienced by those with single sided deafness,” says Vermiglio.
SSD can be caused by viral infections, including measles and chicken pox, trauma, Meniere’s disease, or through surgical intervention such as acoustic neuroma tumor removal. It can also be a side-effect of ototoxic drugs, such as some antibiotics, diuretics, and anti-cancer prescriptions. Many with SSD make significant adjustments to their social life due to feeling highly uncomfortable when communicating, and many remove themselves both socially and professionally.
The BAHAß system—FDA cleared in 2002 to treat SSD in addition to its previous clearances for mixed and conductive hearing loss—is proving the solution for many with significant head-shadow effects.

The BAHA system includes a removable sound processor that connects to a small titanium abutment implanted into the bone on the deaf side behind the ear. The treatment works by transferring sound through bone conduction, stimulating the cochlea in the hearing ear and restoring the ability to hear sounds from both sides.
“The BAHA represents how quickly medical technology is advancing,” says Jack J. Wazen, MD, associate professor of Otolaryngology – Head & Neck Surgery and Neurological Surgery at Columbia University and Chief of Neurotology – Skull Base Surgery at The Lenox Hill / Manhattan Eye & Ear Hospital in New York. “For years, physicians have had to tell their patients there were no treatment options available for SSD. It is very exciting to be able to share this groundbreaking news. This treatment can drastically improve the quality of life for those with this type of hearing loss.”
For Information, contact: Entific Medical Systems, Powell, Ohio; www.entific.com; (888) 825-8484
Directional Hearing
How to Use the Link-it Array Microphone
Link-it is a wireless array microphone that works with hearing aids with built-in t-coils, or through direct audio input. Many clinicians select Link-it for patients with severe-profound hearing loss when FM is not a reasonable strategy. In actual practice, Link-it is equally important for patients with mild-moderate hearing loss who have significant difficulty understanding speech in noise, because they have high signal-to-noise ratio (SNR) loss.
- The microphone bar has three positions. A drop of glue may be needed to secure the bar in place.
- Link-it comes with a medium earhook. One small and one large earhook are also included. If the microphone bar is not horizontal on the ear, the earhook can be changed.
- BTE/ITE: Link-it is factory-set for BTE use. For ITE use, the 2-position switch must be set to ITE.
- Vertical T-coil orientation is recommended with ITEs.
- The H-position (+8 dB magnetic signal strength) on the O-N-H switch can temporarily reduce interference from magnetic fields, such as computer monitors, lighting, and sensors.
- Fine-Tuning Link-it
- • Programmable hearing aids: Reprogram telephone settings for some users because Link-it delivers a stronger signal than the typical telephone.
- • Link-it’s magnetic signal strength is exceedingly high. Adjust the Link-it Gain control if Link-it is too powerful.
- Link-it’s Use With Other Devices
- • Telephone use: On T setting, turn off or remove Link-it. On M setting, the Link-it signal will not be picked up by the hearing aid because the T-coil is switched off.
- • Remote Controls: Turn off Link-it during RC use.
- • Cochlear Implants & DAI: Link-it can be used with some CIs that have built-in T-coils. DAI: Contact Etymotic with compatibility questions.
For Information, contact: Etymotic Research, Elk Grove Village, Ill; www.etymotic.com; (888) 389-6684
Hearing Testing
How to Test with Live Voice Using FONIX Hearing Aid Analyzers
Many dispensing professionals have found that it is very practical to use the live voice of your patient’s spouse or family member when performing real ear measurements. You can do this very easily and quickly if you have the Composite signal and the Real-Ear Option on any of the Frye hearing aid analyzers. Here’s how:

Figure 1. The first step in using live voice on a Frye hearing aid analyzer is to put the thresholds, UCL, and target on the real-ear SPL screen.
- Put your thresholds, uncomfortable levels, and target up on the real-ear SPL screen (Figure 1).
- Choose the Composite signal—turn on the noise reduction of the aid, if available.
- Turn the amplitude of the analyzer to “off.” This puts you in Spectrum mode and turns any noise or signal in the fitting room into a test signal.
- Ask the family member of the patient to speak (Figure 2), and watch the display of the analyzer as the frequency response changes with the modulation of his/her voice. This demonstrates to your patient and the family member how well or poorly the hearing aid is amplifying speech. If the family member has a weak voice, it can be an especially effective tool in helping him/her realize how close she needs to be for her voice to exceed the patient’s threshold levels.
- Have the speaker get close to the client and then move farther away. Ask for a shout to show how the aid reacts to loud sound. Directionality can be tested by having the speaker talk from different angles or by turning the client around in a swivel chair. The dispenser can use his/her own voice as well in this demonstration.

This technique is quick and easy, and it can be a great way to demonstrate the effectiveness of the hearing aid to your patient and his/her family members.
For Information, contact: Frye Electronics, Tigard, Ore; www.frye.com; (800) 547-8209
How to Combat Feedback and Occlusion in a High-Frequency Loss Fitting with ReSoundAIR
Problems inherent in fitting high frequency hearing loss are specifically addressed in the design of the ReSoundAIR hearing instrument line. The two most difficult-to-overcome obstacles with high frequency losses are occlusion and feedback. Through the use of unique software and hardware designs, ReSoundAIR effectively addresses both of these problems.

By opening the fitting to help reduce occlusion, you would typically encounter feedback problems. Traditionally, the only way to deal with feedback has been gain reduction in the high frequencies, which jeopardizes the effectiveness of the fitting. However, ReSoundAIR instruments utilize the Stabilizer digital feedback suppression algorithm to effectively take feedback out of the picture. By utilizing the Stabilizer system, you are able to deliver approximately 25 dB of insertion gain at 4000 Hz without encountering feedback issues.
By staying within the fitting range and utilizing the Stabilizer digital feedback system, ReSoundAIR becomes the solution of choice for a tough high-frequency hearing loss.
For Information, contact: GN ReSound USA, Bloomington, Minn; www.gnresound.com; (800) 248-4327
How to Use the Hearing in Noise Test (HINT) CD
The Hearing In Noise Test (HINT), developed by the House Ear Institute of Los Angeles, measures speech intelligibility using both ears (binaural directional hearing) and plays a critical role in assessing one’s ability to communicate with speech in noisy settings. The test requires the subject to recognize and repeat short sentences under both noisy and quiet conditions.
The HINT CD is a simple, 1-minute test. Insert the CD into any compatible device with speakers or headphone outputs (walkman, computer, stereo). The CD comes with a scorepad for the test administrator.
- Quick, 1-minute test;
- No special equipment required;
- Measures SNR loss that cannot be reliably predicted from pure-tone audiograms.

A more in-depth testing version of HINT is available. HINT for Windows® is a software system that allows automated administration, organization, and storage of the tests. Testing can be conducted with earphones or speakers. HINT also includes a manual pure-tone air conduction audiometer capability.
To use HINT for Windows: 1) Download the HINT software and the calibration values to a PC that has a USB port; 2) Connect the interface box to the PC, the headsets, and the microphone. 3) The patient wears a headset and has a microphone for repeating the sentences; the administrator wears a headset for monitoring the test.
HINT speakers can be connected to the interface box for free field testing. This equipment allows measurement of the subject’s reception threshold under four conditions: quiet, noise in front, noise to the right, and noise to the left. HINT is available in a children’s version and in English, Cantonese, Japanese, and Canadian French. Coming soon are Mandarin, Latin American Spanish, and Castilian Spanish versions.
For Information, contact: Maico Diagnostics, Eden Prairie, Minn; email: [email protected]; (888) 941-4201 ext. 423
Professional Issues
How to Become Board Certified by the National Board for Certification in Hearing Instrument Sciences (NBC-HIS)
Some of the most highly experienced hearing health care professionals in the world share a distinguishing symbol—the symbol of certification through the National Board for Certification in Hearing Instrument Sciences (NBC-HIS). The National Board for Certification is an independent, non-profit, credentialing organization established to promote continuing competency assurance of hearing health care professionals and to provide a standard of excellence in hearing health care.

- Enhances your professional credibility and advances career;
- Increases your earning potential (studies show that specialists with Board Certification have average higher incomes than those without);
- A listing in the annual membership directory and consumer information kits;
- Enhanced brand image of your practice through NBC-HIS support materials;
- Periodic newsletters and industry news.
The Examination Process
The certification process for hearing health professionals consists of a psychometric exam developed by the NBC-HIS Exam Committee, and it is administered by individuals that have earned the BC-HIS designation. Designed to test the knowledge and skill levels required to excel as a hearing care professional, this advanced exam is based on practical knowledge of dispensing and decision-making capabilities.
Certification Requirements
To be eligible to take this exam, hearing care professionals must submit proof of the following:
• 2 or more years of full-time dispensing experience;
• Have a state/provincial license or equivalent (where req.).
Maintaining Certification
A hearing health professional with the BC-HIS designation has taken extra measures to show they are committed to helping the hearing impaired by:
• Meeting continuing education requirements;
• Abiding by the NBC-HIS Code of Ethics for professional conduct.
All Board Certified individuals must re-certify their credentials every three years. During the third year of certification, NBC-HIS will provide the forms and instructions necessary to complete the re-certification process.
For Information, contact: National Board for Certification in Hearing Instrument Sciences Livonia, MI; www.hearingnbc.org; (734) 522-2900
Fitting Tips
How to Effectively Manage Occlusion in Three Steps
Effective occlusion management is one of the most prevalent challenges facing hearing aid professionals today. The majority of hearing aid users are not satisfied with the sound of their own voice and the sound quality of their hearing instruments. If occlusion is properly managed, patients can expect an improvement in both of these areas.

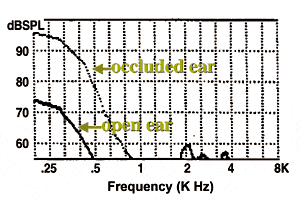
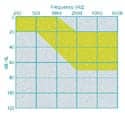
Step 1. Determine if occlusion is a potential problem: Occlusion occurs when the outer ear is occluded—typically with a hearing instrument—and the result is the patient experiences an increase in loudness due to the trapped bone-conducted stimuli. Patients generally complain that their own voice is distorted, chewing is uncomfortably loud, and/or they feel their hearing is plugged up. It typically becomes an issue when the low frequency hearing loss is less than 35 dB (see graph).
Step 2. Choose a hearing instrument with OpenEar Acoustics™: OpenEar Acoustics™ by Oticon Inc has been developed as a ground-breaking technology that directly challenges the practice of occluding the ear by providing substantially larger vents without the occurrence of feedback. This new technology is now available in both Adapto and Gaia aids. In order for OpenEar Acoustics™ to be successful, the following criteria must be met:
- Short processing delay – This ensures that the non-amplified sound reaches the eardrum at essentially the same time as the amplified sound, contributing to a more natural sound quality.
- Dual-Mode Dynamic Feedback Cancellation System – A system that continuously monitors for feedback. It invokes a fast adaptation mode, cancelling feedback almost instantaneously. When feedback is not imminent, the system remains in its slow adaptation mode to monitor for slow changes in the acoustic feedback path.
- Low Frequency Gain Compensation – The Genie fitting software automatically calculates the additional low frequency gain required to compensate for leakage of low frequencies resulting from the larger collection vents.
Step 3. Satisfied User: Results of a recent blinded study1 indicated that the larger collection vents, a part of the OpenEar Acoustics™ system, resulted in greater acceptance of hearing instruments by both new and experienced hearing aid users.
Reference
1. Schum D, Pogash R. Blinded comparison of three levels of hearing aid technology. Hearing Review. 2003; 10(1): 40-43,64.
For Information, contact: Oticon Inc, Somerset, NJ; www.oticonus.com; (800) 526-3921
Pediatric Audiology
How to Fit Children with Digital Instruments: Supero and RECD direct
Fitting children with digital hearing instruments presents many challenges. Phonak’s line of Supero hearing instruments is designed to meet these challenges and let you provide the highest quality fitting for children with moderate-to-profound hearing loss.

Power Dynamic Control—For Maximum Audibility and Comfort: Setting the output limiting correctly is a major issue when fitting children, since this group is often subjected to very high output levels. It is vital to protect these children effectively from loud sounds and from sudden noise impulses with high peaks. The Supero three-phase power limiting strategy continually analyzes the output signal in three separate time frames, offering protection from longer-lasting loud sounds and from high-intensity impulse sounds. This intelligent system offers the child the ultimate in audibility and listening comfort.

Until now, it has not always been possible to measure individual RECD because the traditional procedure is time consuming and requires specialized hardware and software. Simplifying the RECD measurement has been the goal in the development of RECD direct. It serves as a fitting tool, providing RECD values accurately and easily without the need of external test equipment. The measurement takes about 5 seconds and the results are automatically integrated in the Supero gain and MPO calculations.
For Information, contact: Phonak Hearing Systems, Warrenville, Ill; www.phonak.com; (800) 777-7333
Marketing
How to Maintain Continual Contact with Customers While Improving Service
An ongoing challenge for hearing care professionals is to maintain regular contact with their patients and keep them coming back for additional products and services. Rayovac offers hearing care professionals a creative way to do this through the notecard program, available free to ProLine® customers. Hearing care professionals can use this effective communication vehicle to keep their businesses top-of-mind with their patients, thereby building their businesses while at the same time providing important personal contact.
When time and personnel are scarce for marketing activities— and yet so crucial to maintaining and building a customer base—these notecards (up to $700 value per year with order) provide the regular contact that keeps a business forefront in patients’ minds. Rayovac offers three notecard designs suitable for any occasion, such as open houses, battery specials or cleanings, special events, birthdays, and more. The notecards offer a fold-over, confidential design, compliant with recent legislation. They can be customized with the hearing care professional’s name, address, phone number, and special message. Senders can choose pre-written headlines and text or write their own copy.
The notecard program is just one of many business builders Rayovac offers its hearing care professional customers. Rayovac ProLine is the largest selling battery brand among hearing healthcare professionals.
For Information, contact: Rayovac Corp, Madison, Wis; www.rayovac.com; (800) 356-7422
E-Business
How to Order and Conduct e-Business Using an e-Form
Ordering new custom products from Siemens has never been so quick and easy. With the Siemens e-Form, there’s no need for hearing care professionals to fill out paperwork or worry that their order form might be obsolete—e-Form is always up-to-date.
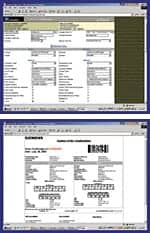
E-Form is part of the Siemens e-business web site, the industry’s first and still only e-business Web site to offer custom hearing instrument ordering online. The password-protected site grants registered members convenient access to the Siemens Ordering Center 24 hours a day, 7 days a week.
The e-Form automatically validates a hearing care professional’s selections to ensure accuracy and help prevent orders from being delayed due to incomplete/missing information. To order custom products via e-form:
- Log onto the Siemens e-business Web site via www.siemens-hearing.com to enter the main screen;
- From the main screen, select “e-Form” from the top navigation bar. This leads to the next screen where you can select the “enter order” button or “e-Form Ordering” on the side navigation bar to access the e-Form.
- Fill in necessary fields by entering the pertinent patient information and other required details. When placing a binaural order, if the left and right information is exactly the same, you need enter it only once, as the details will automatically be copied from one side to the other.
- Then select the “Product” and “Circuit” desired. Once these selections have been made, only options available to that specific instrument are listed for selection. This helps ensure that the order information is accurate and prevents the order from being rejected due to invalid selections.
- Next, scroll down the page to enter the audiometric information and make other selections as indicated.
- Select “confirm” at the bottom of the page. The order confirmation page will appear; this allows you to review all information for accuracy. Once verified, click “print confirmation” and send it to Siemens along with your impressions.
For Information, contact: Siemens Hearing Instruments, Piscataway, NJ; www.siemens-hearing.com; (800) 766-4500
Fitting Tips
How to Trouble-Shoot the “My Voice Doesn’t Sound Right” Complaint Using VoiceManager
One question that has challenged dispensing professionals for years is the complaint “my voice doesn’t sound right!” From the patient’s perspective, the ability to accurately describe what it is about his/her voice that does not sound right can be frustrating. From the dispenser’s perspective, troubleshooting and making the correct fitting changes can be problematic.

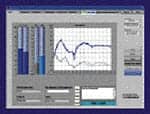
Position: Have the patient speak aloud and identify the position of their voice. The goal is to have the patient’s voice sound as if it is coming from just in front of his/her mouth. Most people do not pay attention to the “position” of their voice, but they become very aware when it is not correct. In the Voice Manager menu, click the “Position” button if the voice is not in the desired front-of-mouth position, then select the position where they feel their voice originates (eg, from the right, from the left, from the nose, from the throat, from inside, or from far front). Once you have correctly positioned the voice, and if the patient still feels they have a voice problem, then move onto Occlusion.
Occlusion: First, have your patient speak aloud while turning the hearing aid microphones on and off. Ask the patient about the sound of their own voice under both conditions (microphone on vs. microphone off). If their voice sounds un-natural in both conditions, click on the “Adjust for Occlusion” button to adjust the fitting until the occlusion is satisfactory. If the patient feels they still have a voice problem, then proceed to Voice Quality.
Voice Quality: After position and occlusion have been ruled out or adjusted for, the next step is to adjust for voice quality. Again, instruct the patient to speak aloud while listening to their voice. Click the “Adjust for TinnyBrassy” or “Adjust for HollowMuffled” buttons until their voice sounds natural.
Once you have made the proper adjustments in these three areas, the patient’s voice should now sound more natural. Click the “Done” button to exit the manager. Sonic innovations has found this to alleviate the majority of patients’ complaints of “my voice doesn’t sound right.”—Thomas J. Tedeschi, AuD
For Information, contact: Sonic Innovations, Salt Lake City, Utah; www.sonici.com; (888) 423-7839
Case Study/Fitting Tips
Case Study: Combatting Feedback-Prone Ears Using Adaptive Feedback Cancellation
Every clinician has experienced the feedback-prone ear. The patient appears to have a “normal” ear, ear canal, and admittance results. Even the hearing aid fitting seems perfect with good canal direction and small venting. Yet feedback persists. What to do? In the past, not only did the clinician spend valuable time trying to combat the problem, but his/her first impression to the patient was poor. Traditional feedback management strategies focus on manipulating the frequency gain characteristics, and ultimately decreasing gain in areas of speech importance.
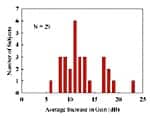
Fortunately, a new type of strategy has emerged. Feedback cancellation relies on analyzing the frequency and phase characteristics of the feedback, then subtracting (or canceling) the feedback from the signal. This strategy results in no gain reduction or frequency response change. Actually the opposite occurs – the patient experiences more gain with the feedback canceller active than without it. Figure 1 demonstrates the amount of extra gain achieved for 29 subjects with Starkey’s Adaptive Feedback Cancellation algorithm available in Axent II DSP hearing aids. As seen in the graph, an increase of approximately 12 dB is typical.
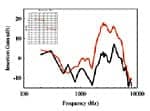
S8 is one of those “feedback-plagued” patients, and did not have an audiogram (Figure 2, inset) from which one would expect persistent feedback. Nonetheless, S8 has had such severe feedback problems that he has never worn hearing aids successfully. He demonstrated normal-looking ears and normal admittance measures, and the physical fit of his aids also appeared to be good. With Adaptive Feedback Cancellation active, S8 was able to realize adequate gain for the first time. Figure 2 demonstrates the increase in insertion gain afforded to S8.
Looking at the insertion gain results prior to adaptive feedback cancellation, it should be no surprise that S8 derived little benefit from amplification. With Adaptive Feedback Cancellation, S8 received 16 dB more gain before feedback at 3 kHz, and realized a dramatic increase in hearing benefit.
For Information, contact: Starkey Laboratories, Eden Prairie, Minn; www.starkey.com; (800) 328-8602
Telephone Use
How to Provide Normal Phone Use Without Feedback: Conversa with ClearCall
Anew premium digital instrument, Conversa, features a unique feedback suppression system that can address everyday feedback problems experienced by your patients. Conversa utilizes a Realtime Feedback Canceller that dynamically suppresses feedback using 12 independent feedback detectors simultaneously attacking multiple feedback peaks at different frequencies. The Realtime Feedback Canceller can eliminate feedback within 60 milliseconds, without diminishing the clarity of the speech signal. Many patients using Conversa have been successful using a cell phone or telephone normally without feedback for the first time.

After creating customized programs for your patient, the first step is to check for feedback when using a telephone. Have your patient bring the phone directly to their ear, as they would normally use the phone. Selecting a different program or setting is not required. If the patient can use the phone normally without feedback, no additional steps are required. If feedback is present additional steps may be required.
In the programming software the Realtime Feedback Canceller can be turned off. If feedback is present when the Realtime Feedback Canceller is off, it is reasonable to assume that the physical fit or venting is causing the feedback. If the Realtime Feedback Canceller is already being used to suppress feedback due to fit or venting, it may not be capable of also suppressing the feedback caused by the telephone.
To determine which frequencies are causing the feedback when the Realtime Feedback canceller is turned off, a quick Feedback Optimization test can be run. A curve will be displayed, showing the maximum gain that can be obtained in each channel without feedback. The following options are available:
- Accept: If the test displays a minimal decrease in gain, accept the results to limit gain at the frequencies that are causing the feedback.
- ReRun: Rerun the test if there is significant noise during the test or if a change was made, such as closing the vent or repositioning the hearing aid.
- Cancel: If a significant amount of gain reduction is required to prevent feedback, a remake may be necessary or the vent size may need to be decreased.
Conversa with ClearCall can allow your patients the ability to enjoy hassle-free telephone use whether they are using a BTE or CIC.
For Information, contact: Unitron Hearing, Plymouth, Minn; www.unitronhearing.com; (800) 888-8882
Hearing Testing
How to Use DPOAE/TEOAE Screening/Clinical Assessment for All Ages Using Vivography™
The continuous recording of the waveform of OAE signals in “real-time” can be performed through a new technology called Vivography™. This measurement of OAE levels is robust in noise, very fast, accurate, and highly reproducible—even in poor SNR conditions. The instrument performs automatic pre-testing of probe calibration, system DP/TE, and system noise in a 1cc cavity. An in-situ pre-test probe-fit check, and stimulus level, spectrum, and stability are automatically adjusted prior to each test. All commands can be initiated from a Touch-Screen. An Infant Probe and mini-printer are available as options.
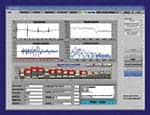
Preparing for a Test: Main functions are easily accessed from one screen via tabs: “Test” launches the testing screen; “Patients” (as shown) allows for patient entry and/or selection; and “Planner” is used for test planning/scheduling/follow-up.
Creating and Selecting Testing Protocols: Protocol parameters include stimulus and Pass-Refer criteria settings. Pass-Refer decision-making can be “Automatic,” “Manual,” or run in an “Assessment” mode in which the results are recorded but no screening decision is made. Protocols are created easily using the “Protocols” tab, but a desired protocol can be selected directly from the test screen.
Running the Test: Testing time is typically less than one minute per ear but varies depending on noise conditions, the selected protocol, and the patient’s emission levels. If the acoustic conditions of the test are inadequate (according to the pre-set criteria), a “Test Insufficient” message will appear. Otherwise the Test screen will display the test data in graphic form in real time.
Database and Reporting: The Database screen displays test results for a selected patient or a statistical analysis of results for a group of tests derived from a database query. A list of test results can be generated based on user-selected criteria. Individual test results can be printed that display detailed patient demographics, test conditions, and test results.
For Information, contact: Vivosonic Inc, Toronto; www.vivosonic.com; (416) 231-9997
Fitting Tips
How to Ensure Patient Satisfaction Using the Senso Diva ITC
Fitting a custom Senso Diva hearing aid is simpler than you think. However, there are several steps to remember in order to ensure satisfaction with the fitting.
1. Start with a perfect ear impression. Make sure that the earcanal is clean before you take the impression. Also make sure the impression material goes beyond the second bend, and covers the tragus and helix areas of the pinna.

3. Perform Sensogram in quiet room. An in-situ threshold measure (sensogram) at 500, 1000, 2000, and 4000 Hz is required to specify gain at these and other frequencies. Frequencies within the interoctaves can also be tested for more precise threshold specification. The expanded sensogram may be helpful for atypical audiograms with >20/octave change in hearing thresholds.
4. Conduct feedback test. A feedback test will be needed to estimate the feedback path and set the gain limit of the Senso Diva. Make sure that the test is performed in a quiet room with no reflective surfaces near the patient. A slight “jaw-open” position is desirable.
5. Voila! You have just fit a Senso Diva hearing aid successfully. This will satisfy the majority of your patients.
Additional fine-tuning may be necessary for a small number of patients. Before fine-tuning, however, remember the following:
- Make sure that your patients have realistic expectations;
- Give the default setting a try (at least 1-2 weeks). In many cases, patients would prefer the default Senso Diva settings over any modifications;
- To understand patient objections, it may be helpful to examine some of the fine-tuning screens (ie, input-gain screen, input-output screen, frequency-output screen at various input levels, and speech spectrum screen).
For Information, contact: Widex Hearing Aid Co, Long Island City, NY; www.widexusa.com; (800) 221-0188