By Tammara Stender, AuD, and Astrid Haastrup, MA
How to verify environmental steering/noise-reduction and wind-noise reduction features.
In March 2012, the “Recipes for Verification Success” article1 provided “recipes” for verifying gain, noise reduction, and directionality in a systematic, streamlined manner. However, there are many more hearing aid features that could be verified in the clinic. Part 2 provides recipes for verifying environmental steering features for gain and noise reduction, as well as wind noise reduction functionality. As with all verified features, communicating the results to patients (and the significant other) can instill greater confidence in the hearing instrument performance, as well as the professionalism of the hearing care provider.
Real-ear verification is a multifunctional, indispensable tool for dispensing professionals. This single piece of equipment:
- Informs the clinician about differences between predicted and actual responses in the individual patient’s ear;
- Calculates the amplification provided by the hearing instrument;
- Demonstrates and documents functionality and effectiveness of advanced hearing instrument features, such as noise reduction and directionality;
- Permits the professional to diagnose problems when a hearing instrument dysfunctions;
- Improves the counseling process regarding hearing instrument use and patient expectations; and
- Builds confidence in the fitting, from the perspective of both the hearing professional and the patient.
Real-ear verification equipment is the “multifunctional cooker” of the hearing care professional’s “kitchen.” Like a combination blender/food processor, the special tests and customizable signals of verification equipment make it versatile for accomplishing a multitude of tasks—all with the press of a button or two.
Multifunctional kitchen equipment is popular as it is often time-saving. Use of verification procedures when fitting hearing instruments has similarly been shown to save time for the hearing care professional, by reducing the number of follow-up visits. A study of 788 patients fitted with hearing instruments revealed the average number of patient visits decreased when basic verification procedures were followed.2 This finding indicates that performing verification during the fitting has a positive impact on time management and clinic productivity.
Every new piece of cooking equipment comes with an Operator Manual. Real-ear equipment likewise is delivered with online or printed user guides. However, steps for verifying certain aspects of hearing instrument performance may not be detailed for the hearing professional.
The previous “Recipes for Verification Success” article1 suggested protocols for verifying gain, directionality, and noise reduction. Part 2 details how a hearing care professional might verify two additional features of modern, high-end hearing instruments: environmental steering of gain and/or noise reduction, and wind noise reduction. As before, specifics of these features will not be discussed in this article, as the focus will be on general guidelines for their efficient real-ear verification in the clinic.
Variations on these recipes also may be acceptable, depending on the version of the real-ear equipment used and the hearing instrument’s abilities and limitations regarding these features. While this article provides guidelines, the hearing professional (the “chef”) may choose to verify these features in slightly different ways, based on clinical judgment.
The Mise en Place, Revisited
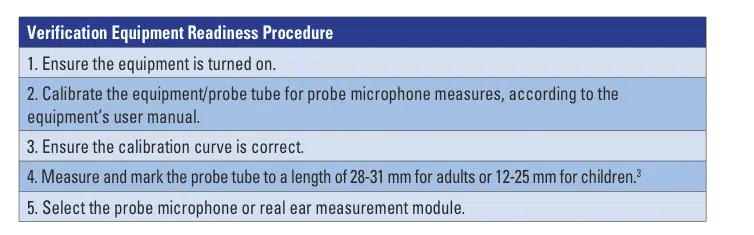
Just as chefs in professional kitchens organize their kitchen equipment and ingredients for a recipe as a first step to ensure efficient culinary success, it is similarly prudent for hearing professionals to make certain preparatory measures prior to conducting verification measures. These steps include becoming familiar with the real-ear equipment and the features being verified, assembling and pre-measuring the length of the probe tube, calibrating the equipment and/or probe tube, and arranging tools such as an otoscope, the PC, hearing instrument programming equipment, and a jump drive near the real-ear equipment. Specific steps involved in this process are outlined in the Verification Equipment Readiness Procedure (Table 1).1
The following recipes were written so as to be generally applicable for use with most real-ear verification equipment. However, the recipes were “tested” using the Audioscan Verifit (Model VF-1)4 and the Otometrics Aurical FreeFit.5 The Verifit consists of a test box, a probe microphone assembly, and a screen with an integrated speaker. The Aurical includes an audiometer, a loudspeaker, the FreeFit Probe Microphone Measurements assembly, and a test box. With both the Verifit and the Aurical, data can be printed or stored to a retrievable file.
The Two Recipes
This article contains two recipes outlining how to verify environmentally steered gain and/or noise reduction, and wind noise reduction. Verification of environment-dependent gain changes and noise reduction ensures the functionality of this feature while providing information about how it automatically adjusts the gain and noise reduction settings for different acoustic environments. Wind noise reduction reduces wind noise and brings listening comfort to the patient. Verification in the clinic can assure the patient of this feature’s functionality and its potential benefits. The figures relating to each recipe were obtained through verification with the Aurical FreeFit system.

|
| Table 1. Verification Equipment Readiness Procedure. (Click to enlarge) |
Verifying the Environmental Steering of Gain and/or Noise Reduction
1. Ensure completion of the Verification Equipment Readiness Procedure (Table 1).
2. Perform otoscopy.
3. Insert the probe microphone into the patient’s ear.
4. Position the hearing instrument in the ear, and ensure that it is turned on. To ensure the maximal gain or noise reduction changes are visualized through real-ear verification, turn off other features (eg, directionality and feedback suppression).
5. In the fitting software, set the environmental steering of gain or noise reduction for quiet sounds to a minimal level or “off.”
6. Select a customizable test on the real-ear equipment.
7. Choose a white-noise stimulus at a quiet level (0-50 dB SPL).
8. Start the test, letting it run for up to 20 seconds to permit the full gain or noise reduction adjustment, and capture the resulting curve.
9. In the fitting software, set the environmental steering of gain or noise reduction for quiet sounds to a maximal level, so that the greatest degree of change occurs in this environment.
10. Run a second test for up to 20 seconds to permit the full gain or noise reduction adjustment with these settings, and capture the curve.
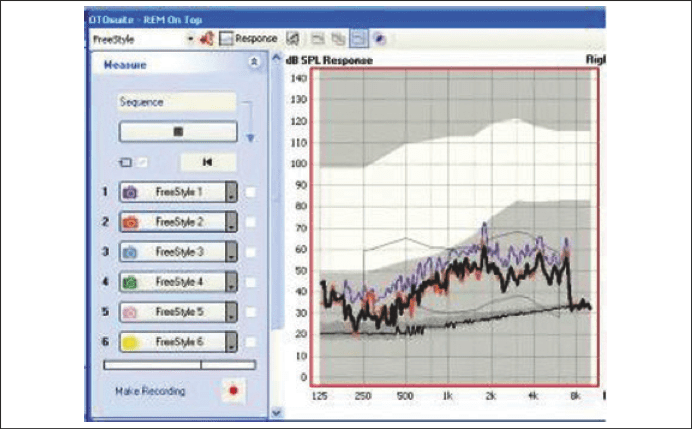
11. Observe the level difference across the frequency range when the minimal and maximal changes in environmentally steered gain or noise reduction are activated. For example, the curve obtained with the maximal setting of environmentally steered noise reduction should have smaller amplitude than the curve obtained with the minimal setting (Figure 1).
12. Run an additional curve to show the response when the environmental steering is set to the user’s settings for quiet environments.
13. Save and store the results in the patient’s file.
Option: Run an additional curve with a quiet white-noise stimulus while changing the environmental steering for a different acoustic situation, such as loud noise or speech. No change to the curve should occur, as steering adjustments for a loud or speech-like acoustic environment should not be applied when the actual acoustic environment is quiet (also shown in Figure 1).
Variation: This verification also can be performed for different environmental steering settings, such as moderate noise. In this case, choose a moderate white-noise stimulus level (65-70 dB SPL) and observe the difference in the response for the minimal and the maximal settings in this environment.
|
| Figure 1. Environmentally steered noise reduction, measured with the Aurical FreeFit. The purple curve shows the response for the minimal level for a given environment, and the orange curve (synonymous with the overlying black curve) demonstrates the response for the maximal level of noise reduction in the same environment. The thick black curve shows that changing the environmental steering for an acoustic situation that is different than the stimulus results in no change to the response. The thin black line near the bottom is the averaged stored spectrum of the stimulus, which compares the average stored reference microphone measurement to the resulting spectrum recorded in real time at the probe microphone. (Click to enlarge.) |
Verifying Wind Noise Reduction
1. Ensure completion of the Verification Equipment Readiness Procedure (Table 1).
2. Perform otoscopy.
3. Insert the probe microphone into the patient’s ear.
4. Position the hearing instrument in the ear, and ensure that it is turned on. Deactivate all the features.
5. Select a customizable test on the real-ear equipment.
6. Choose a noise-like stimulus at a moderate level (60 dB SPL).
7. Conduct the first test and capture the resulting curve of the environmental background noise.
8. Turn on a motorized fan angled at 45° from the hearing instrument’s front microphone. Adjust the distance and speed setting of the fan so the wind noise is audible in the hearing instrument.
9. Start a second test and capture the curve of wind noise with environmental noise.
10. In the fitting software, turn on wind noise reduction.
11. Conduct a third test and capture the curve. Observe the amount of wind noise reduction provided across the frequency range.
12. Save and print the results to store in the patient’s file.
Variation. As a wind source, you also may use a hair dryer on a cool setting instead of a motorized fan.
Caveats on artificially generated wind: The artificial wind source (fan or hair dryer) also will introduce a certain level of motor noise to the environmental noise. This additional motor noise is not wind noise and subsequently will not be canceled by the wind noise reduction feature. In Figure 2, the fan motor noise can be seen as the difference between the blue curve and the purple curve in the low frequencies.
|
| Figure 2. Verification of unilateral wind noise reduction, on the Aurical FreeFit. The purple curve shows the environmental noise, the orange curve shows the level of the measured wind noise plus the environmental noise, and the blue curve shows the wind noise plus the environmental noise with wind noise reduction activated. The black line at the bottom is the averaged stored spectrum of the stimulus. (Click to enlarge.) |
The Finishing Touch: Communicating the Results
Hearing instrument features are the seasonings that can create an extraordinary, satisfying listening experience. Verification of these features and subsequent communication of their performance highlight their value to the patient. When patients are able to see the functionality of advanced hearing instrument features, it assures them that their hearing instruments can be beneficial in specific, often difficult listening environments, such as changing acoustic situations and the outdoors.
When communicating the verification results of environment-dependent gain adjustments or noise reduction, inform the patient that this test measures the hearing instrument’s ability to automatically adjust the volume or reduce noise in different listening situations such as quiet, speech, and moderate noise. Explain that the first curve shows the response of the signal in “quiet” with this feature turned off; the second curve shows the gain adjustment or noise reduction at its strongest setting; and the curve at the user’s programmed or prescribed settings predicts the response for real-world quiet environments.
If the patient is interested in further demonstration, briefly describe how the hearing instruments can automatically determine the level of sounds in the environment and the presence or absence of speech and noise. Explain that the volume or noise reduction level can vary across different listening situations to create a more customized comfortable fitting as the patient encounters complex and distinct acoustic environments during the day. Also, point out that these defaults can be changed in the clinic according to the patient’s preferences, if desired.
The wind noise reduction test can be used to describe the functionality of the feature and demonstrate how it makes listening in windy outdoor situations more comfortable. Explain to the patient that the hearing instrument has the ability to detect and reduce wind noise, leaving other sounds intact and audible. Highlight in which program(s) this feature will be activated (eg, the “Outdoor” program), and discuss how even mildly windy conditions can generate significant levels of wind noise in hearing aid microphones.
Summary
Verification rounds out the meal of the audiological visit for the patient. It provides the not insignificant course that demonstrates the power of the technology to patients, while reassuring them that the professional is a master of fitting hearing instruments. It is the “value added” component that may help keep patients loyal to their hearing professionals.
Consumers generally want to believe not only in their purchase, but also in the venue or individual through which they acquired their purchase. Verification is one way in which hearing care professionals can distinguish themselves as the best service provider to their patients.
One of the roles of a maître d’ is to ensure that the guests are satisfied with their experience. Hearing care professionals are the maître d’s of the audiology clinic. Verification is an elegant method of promoting user satisfaction, by virtue that the technology is appropriately fitted and that the benefits of the technology are communicated to the patient’s taste.

|

|
| Tammara Stender, AuD, is a senior audiologist at GN ReSound Global Audiology in Glenview, Ill, and Astrid Haastrup, MA, is a senior audiologist at GN Global Audiology in Ballerup, Denmark. |
|
References
1. Stender T, Haastrup A. Recipes for verification success. Hearing Review. 2012;19(3):26-33. Available at: /practice-management/17223-recipes-for-verification-success
2. Kochkin S. MarkeTrak VIII: Reducing patient visits through verification and validation. Hearing Review. 2011;18(6):10-12. Available at: /products/17112-marketrak-viii-reducing-patient-visits-through-verification-amp-validation
3. Bagatto MP. Optimizing your RECD measurements. Hearing Journal. 2001;54(9):32,34-36.
4. Audioscan: Verifit Online User Manual. Available at: http://www.audioscan.com.
5. GN Otometrics: Aurical FreeFit Quick Start, Fitting Systems and Online User Manual. Available at: http://www.otometrics.com.